I am very satisfied with my final animation. Off course there are bits that could have been better but there was not enough time to improve them. If I had time I would have changed the palace scene. Instead of moving camera around the building i would have the camera to follow the car from scene beginning till the part when it stops by the palace. and only then show the whole building by zooming out. I would have also include different shots of the car. Like I indented in my storyboard like drive by, mirror shots. The problem with the last scene were car hits the text have been mentioned in earlier post and could be redone with increased frame rate.
Thursday, 14 April 2011
Animation
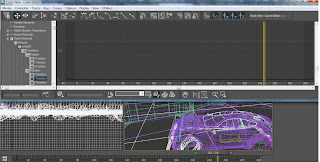
All the scenes were rendered in HDTV 1280x720 resolution as .avi uncompressed files. Rendered scenes were edited in AdobePremiere Pro. The sound was borrowed from internet resources, and movie itself. I tried several export settings for the final animation and got good result with .mp4 and .f4v formats. While doing test renders of animation I noticed that i do not see all content of frame in the camera viewport. I made sure to double check first and last frames to make sure that composition is right.
Final animation:
Final animation:
sound sources:
sound effects http://www.findsounds.com/
"Die Another Day" 2002 movie
trailer http://www.youtube.com/watch?v=tnUalOWhQCQ
Car reactor
My last scene was suppose to have only text that says when movie will be released. After doing my first car animation i thought how can incorporate more animation techniques to my work. Therefore, I came up with idea to have car in the end scene which will drive to film title and release date text and smash it away from the frame. This way reactor was incorporated to the animation. As this scene were indented to be longer in original storyboard i decided not to create the scenes with camera showing the car from different angles as i have car in this scene. This way i still managed to fit into 30second limitation. I tried to do reactor with my car model but i got huge error when tried to preview the animation. Therefore, changed car to a box and used it in reactor. Then for final animation I deleted the box from the scene and replaced it with my original car model. The other problem was that scene was created in new 3d max file and I decided to reset the session properties. This removed my previous 25fps to 30fps which i did not notice until i had to render my scene. This ended up in having about half second shorter animation than indented to. At the end i realised that animation is to fast and text cannot be noticed in such a short time. Therefore, i overcame this in premier pro by reducing speed of collision part. This solved the problem, but the part is choppy as there is not enough frames per second. In future it is worth to take more consideration in certain part lengths and frame rates.
First i created box for the ground, box to act as a car and each text shape was created individually. The final text form was once again created as ones that I already used. With all objects selected i created a rigid body collection.
First i created box for the ground, box to act as a car and each text shape was created individually. The final text form was once again created as ones that I already used. With all objects selected i created a rigid body collection.

Then I assigned masses to the objects. I decreased the gravity to -0.1 on z axis. Col. tolerance was set to 0.5. Friction was changed to 0 for ground object and 0.1 for the car box. Then i moved box with autokey toward the letters. Start frame for reactor animation was set to the one before box was suppose to hit the letters. Then i transferred reactor animation to the timeline with create animation button.

Then box was deleted from scene and replaced with car model. Car was animated using autokey. At the collision section i wanted car to drift ,so car pivot point was resigned to the front. This allowed me to rotate car and created drifting impression. car steering wheel control was also moved with autokey on to make wheels turn to sides.

Finally all materials were assigned to objects and ground object was copied to act as a background. The scene was ligth up with daylight system. And free camera was placed for the static shot.

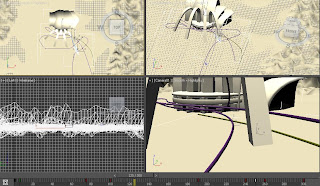
Ice palace
Ice palace scene is made out of three rendered parts. First part is showing car, then camera turns to the ice palace and zoom to it and rotates around it. Second part is when car comes back in the frame and stops. Third part is camera zooming out of the palace with car standing at same place.
First part:
Camera target and car shares same path. The camera has different path. Same thing as in previous animation, same use of animation path constrain. This bit was separate because i had to create new path for car stopping by the palace otherwise it would have flied like camera target. And it would not look to have a car that is going to palace while zooming to the palace when i just left one car behind the frame.
Second part:
Have separate path for the car. The steering control is moved at certain frames to imitate the steering.
Third part:
Was used to remove wheel rotation using curve editor when car is stopped. At this part wheel rotation at its Y axis was removed from whole scene.
First part:
Camera target and car shares same path. The camera has different path. Same thing as in previous animation, same use of animation path constrain. This bit was separate because i had to create new path for car stopping by the palace otherwise it would have flied like camera target. And it would not look to have a car that is going to palace while zooming to the palace when i just left one car behind the frame.

Second part:
Have separate path for the car. The steering control is moved at certain frames to imitate the steering.

Third part:
Was used to remove wheel rotation using curve editor when car is stopped. At this part wheel rotation at its Y axis was removed from whole scene.

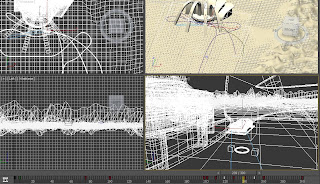
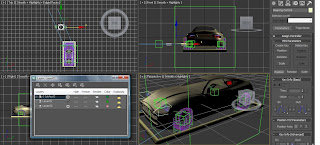
Car Animation
This scene includes car and mountain environment. The camera zooms out from car rim and rotate to back of car filling frame with the car. First car was imported and aligned to the mountain object. Then i created two paths. One for camera target and car, other for camera itself. I assigned objects to the path using animation path constrain option. For the car i checked follow path option and set axis to X.

The camera path had to be edited. Therefore i selected camera path and open modifier panel. There i chose vertices selection and added extra vertices with refine button. Then i moved them to make path smoother.

This scene is 3 seconds long. the original path was too long so i adjusted where objects are at certain frames on the path. Camera moves slightly slower along its path in order to uncover the back of the car.
To make wheels rotate I used autokey went to frame five and rotate wheels by 180 degrees with reference coordinate system set to local. Then I used curve editor to loop rotation throughout whole animation by selecting loop in parameter curve out-of-range types option.
To make wheels rotate I used autokey went to frame five and rotate wheels by 180 degrees with reference coordinate system set to local. Then I used curve editor to loop rotation throughout whole animation by selecting loop in parameter curve out-of-range types option.

Car Rig
The plan was to rig a car for steering, wheel rotation and drifting control. However, I only manage to get along with steering part.
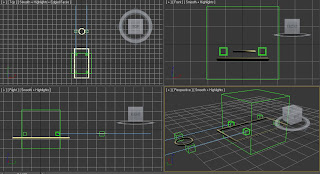
First I created dummy for wheel hubs from create->helpers->dummy window. It was aligned with the first wheel using align tool. Then I copied the dummy and aligned other as well. All four wheel were linked to the dummies that was suppose to provide wheel rotation. Extra two dummies where create for front wheel steering. In front of them to more dummies were created. Previous dummies were constrained to new dummies with lookAt constrain. Therefore, when new dummy is moved the previous wheel dummy rotates to that direction. Then i created the steering wheel control and linked steering dummies to it. The whole car body group and dummies were linked to one dummy so i could have separate objects and still move everything together. Then i created a control for it and assigned the dummy to it. The control were created in separate layer as also the dummies. In the end car model consisted of three layers. One for car objects, other for rig-dummies and third for controls.


Gun Animation. Part2
The next three scenes consist shooting the bullet, bullet flying by 007 text and zoom in of the bullet. The last two scene in final animation actually looks like one. The actual trailer use different scenes that I made at first attempt. I rendered them, but also wanted to try different camera views. It turned out that i did not save previous files and overwrite new scenes over the old ones. I did not use anything fancy for the old scenes. Actually they are similar to the new ones by the use of techniques.
First scene:
scene in animation has gun shooting the bullet and then camera target is moved from gun to the bullet and camera moves out to hide the gun. The scene that i have but have not used in animation is the same. The difference is that camera instead focusing on bullet after shot turns around and show gun from the front.
The animation was done using autokey and moving top part of the gun, the bullet, camera and camera target. I also rotated whole gun for short amount of time to strengthen the feeling of bullet being shot.


Second scene:
The "oo7" text was made same as text in first scene.
The scene that I have has bullet flying in from one corner and then flying out to the opposite frame side. Bullet was animated with autokey on and camera was rotated with autokey on as well. The actual scene that I used have camera and target following the bullet to the left after it appears on the frame.

Third scene:
Is actually longer, but I used it only for bullet zoom in in the actual trailer.
Here I tried different approach. I created ti lines. One is for camera and second one for bullet and camera target. I constrained objects to the lines using path constrain. Then I selected keyframes that were created after this and dragged them to the frame were I wanted my animation to end. With camera selected I changed where camera is on the path at beginning and end keyframes by going to motion panel and changing %Along Path parameter.

Something that would be worth mentioning that my gun and bullet has some kind of noise and gradient look. The materials do not actually look as indented. My thought that this was caused by the environment rendering properties. Turning of daylight system did not removed the effect. Later i tried to mess with some options and it seemed that exposure control setting had impact on the materials. Well in trailer it still looks fine. Need to be aware of this in the future.
First image with "mr photographic exposure control" as in my animations. Second image with no exposure control


Subscribe to:
Posts (Atom)